library(usethis)
use_git_config(user.name = "Jane Doe", user.email = "jane@example.org")12 GitHub
12.1 Git and GitHub - what is it and what is it good for?
Let’s start with Git (shortcut for Global Information Tracker). It is a version control system, which means a software tool to track, manage and organise changes to files over time. It’s like the ‘Track Changes’ mode in Microsoft Word, but more powerful and scaled up to track multiple files in a folder called a repository (repo). It tracks and records changes to a file and allows you to recall a specific version at any time later. It was originally developed and used by professional software developers, but it also provides many advantages for data science. The data science community uses it not only for tracking source code for the analysis, but also source data, results and figures.

A huge advantage comes when you start to collaborate with other people. This is where hosting services for Git-based projects come in. We already showed you a little bit of GitHub in this course, but we will explain its functionalities more consistently and in more detail now. Git is a software that you have locally on your computer. GitHub is the host server, allowing for collaboration of multiple people on the same project. Imagine it as if you have a Word document where you work on your own, but move it to Google Docs so that more people can collaborate on a single file. But there’s much more than in Google Docs. With GitHub, you can, for example:
create a repository to collaborate on a certain analysis with several people
publish data and code for the analysis you did in your paper, and link the repository to Zenodo to store them permanently
find and download data or code from someone else’s repository
publish an R package, or download an R package published there
use Issues to track problems in the code
host a webpage like this one
12.2 Find and download data and code
First of all , GitHub is a huge repository of open-source code and data. Many researchers collaborate on their analyses through GitHub and publish their data and code associated with their scientific articles there. You can also find many R packages there. You can browse the resources published there even without a GitHub account. Open the GitHub main page (https://github.com) and in the top right corner, you will find a search box. You can search for repositories, users, packages… You can try find our personal accounts by typing our names in the search box. Next, you can try to find the repository with the code for this website by searching for ‘BotzoolDataAnalysis’.
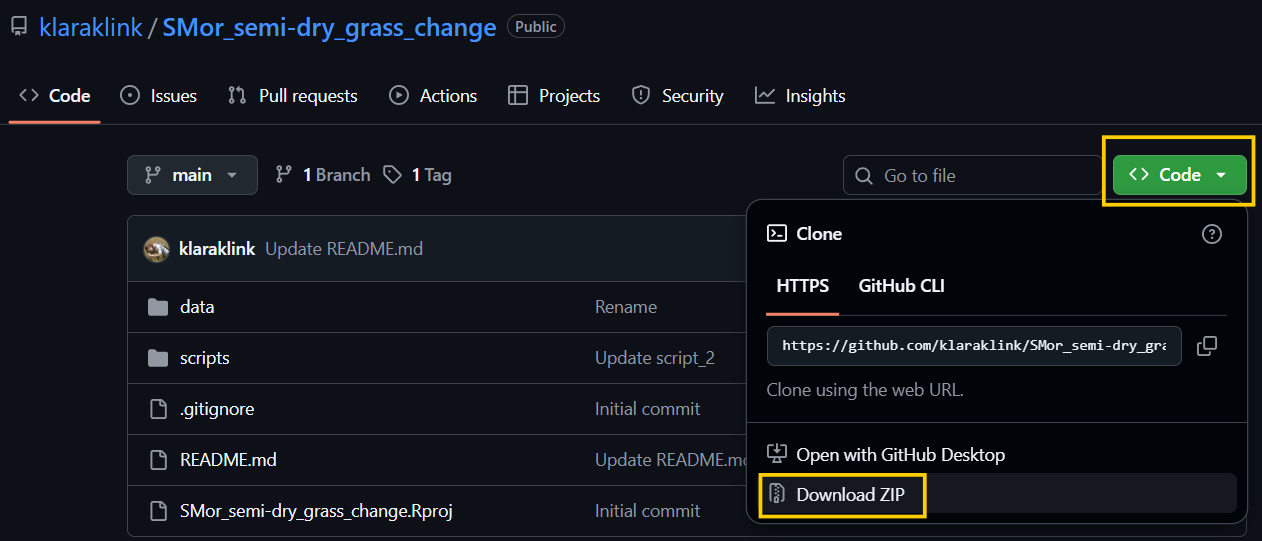
In some published studies using an R code for the analysis, you might find a link to the GitHub repository with the code in the Data Methods section or in the Data Availability Statement. You can find an example of such repository storing code from a published article here: https://github.com/klaraklink/SMor_semi-dry_grass_change. You can check the structure of the repository and read more about the data in the README.
You can not only look at the code online, but also download the whole repository to your computer by clicking on the green button ‘<> Code’ and then ‘Download ZIP’.
12.3 Set up your own account
For other operations with GitHub, e.g., creating your own version control repository, collaborating on the analysis with others, or publishing code from a paper, you will need to create your own GitHub account. We will now go through the setup together.
12.3.1 Create a GitHub account
First of all, you’ll need to create your own account at GitHub.com. It is worth paying some attention to your username, which should preferably include your name. You can change it later, but it’s better not to do it.
12.3.2 Install Git
Install Git if you don’t have it installed already. You will have to use the command line to interact with Git, you can find more information here. You can launch it directly from RStudio using the Terminal window, which you will usually find next to the Console.
Type which git to see if you have Git installed somewhere in your computer.
which gitThe following line will tell you which version you are using.
git --versionIf you get a message like git: command not found, you’ll have to download and install Git for Windows or macOS. Look here for more guidance.
12.3.3 Introduce yourself to Git
This is possible either using the Terminal:
git config --global user.name "Jane Doe"
git config --global user.email "jane@example.com"
git config --global --list
or using the usethis package:
Replace the example name and email with your username and email associated with your GitHub account.
12.3.4 Personal access tokens
We now have to make sure that RStudio can communicate with Git. Confirm, that Git has your username and email by running
use_git()Then, generate a personal access token using
create_github_token()Click ‘Generate token’ and copy the token to a safe place.
Then, add the personal access token (PAT) to RStudio:
gitcreds::gitcreds_set()Paste the PAT in response to the dialogue in the console:
? Enter password or token: ghp_xxxxxxxxxxxxxxxxxxxxxxxxxxxxxxxxxxxx
-> Adding new credentials...
-> Removing credentials from cache...
-> Done.
You should now be able to work with GitHub from your RStudio. Look here to read more about personal access tokens and GitHub-RStudio configuration.
12.4 Create a GitHub repository
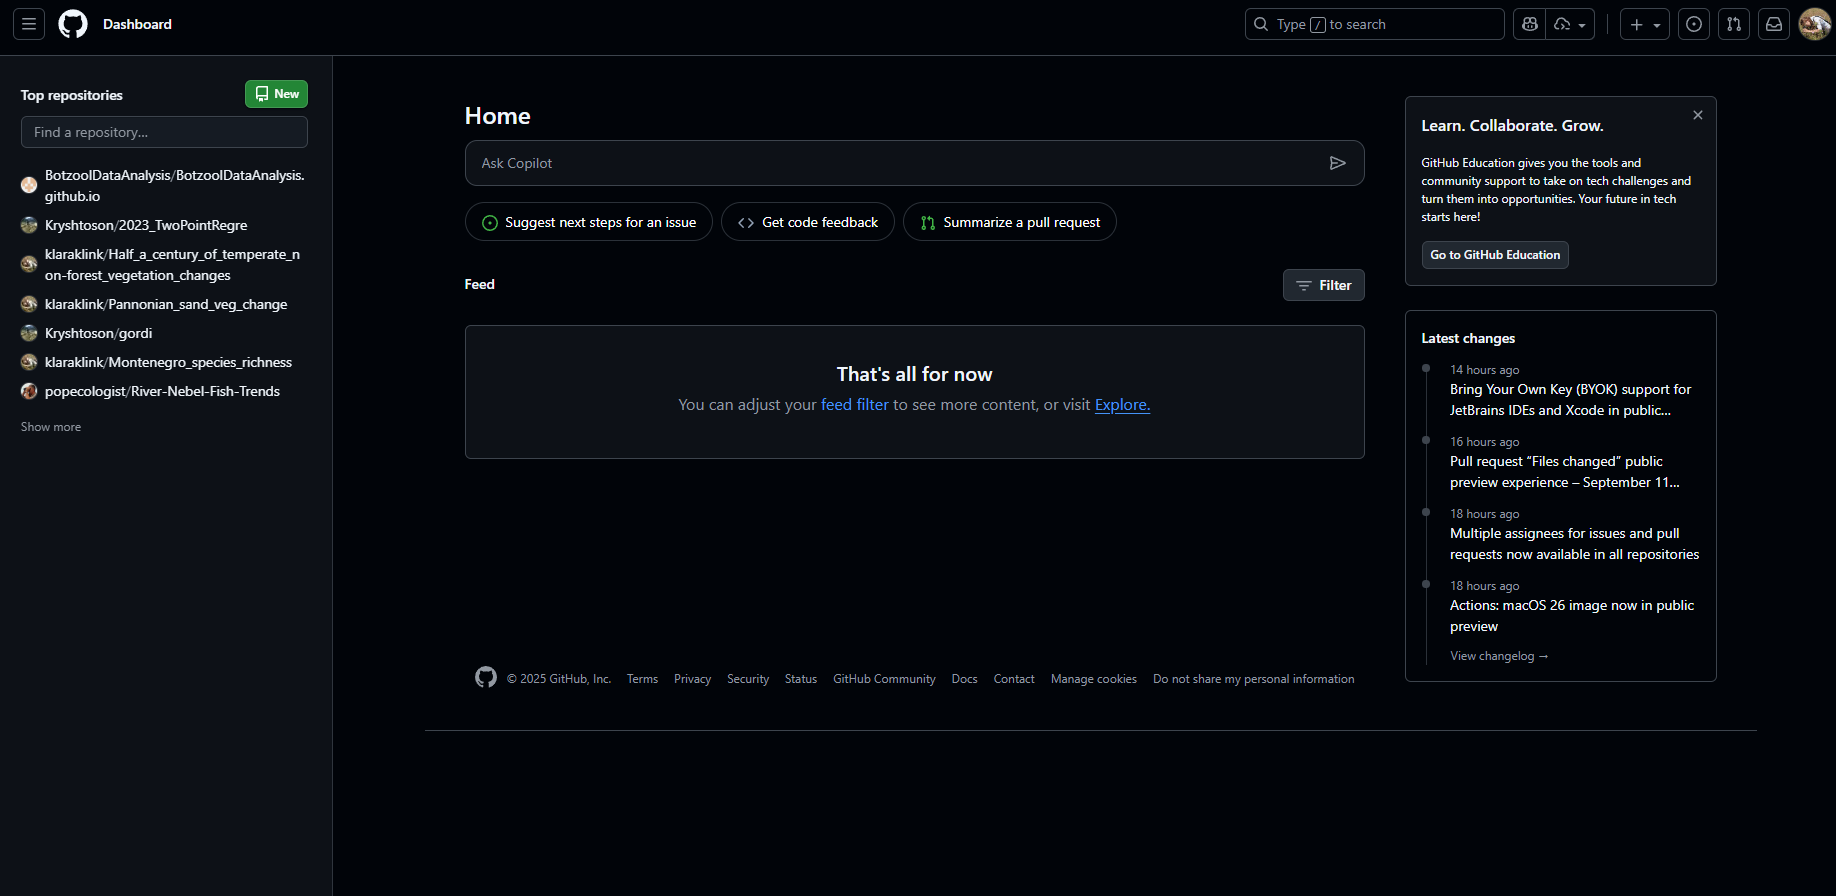
Go to https://github.com and log in. You might see something like this:
Click on the green button to create a new repository. Enter the name of your first repository. You can also add a brief description. Let the repository be public and initialise a README file by clicking on the ‘Add README’ button. Then click the green button ‘Create a repository’ at the bottom of the page.
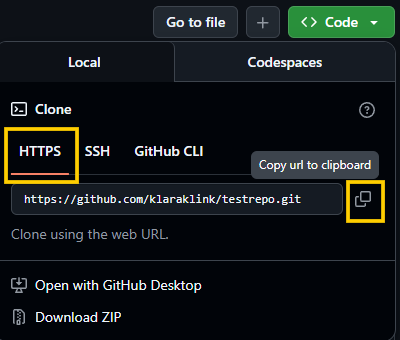
To link the repository to a folder in your computer, click the green button ‘<> Code’ and copy the URL to clipboard
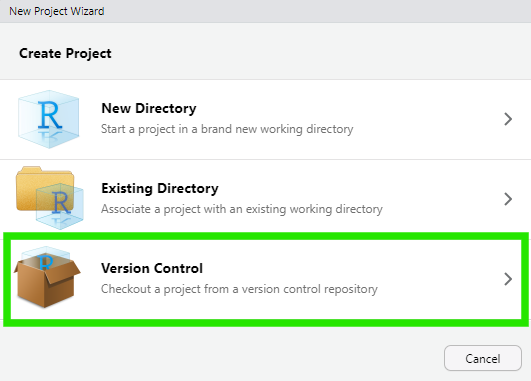
In RStudio, start a new project. Instead of the usual ‘New Directory’ click on ‘Version Control’.
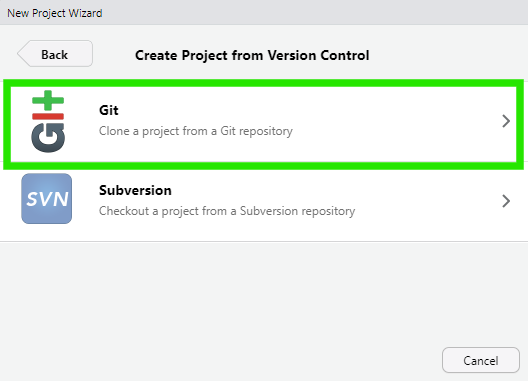
Choose ‘Git’.
And enter the URL of your new repository.
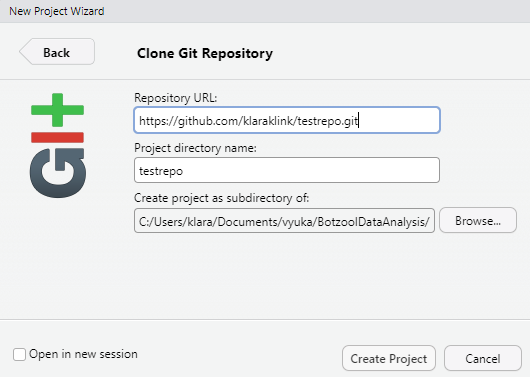
Choose a folder where you want your project to be saved. It might be the folder you use for this course. Click ‘Create Project’. This will create an R project in your computer linked with the remote GitHub repository.
Look in the file browser pane if you find a README file there and open it in RStudio.
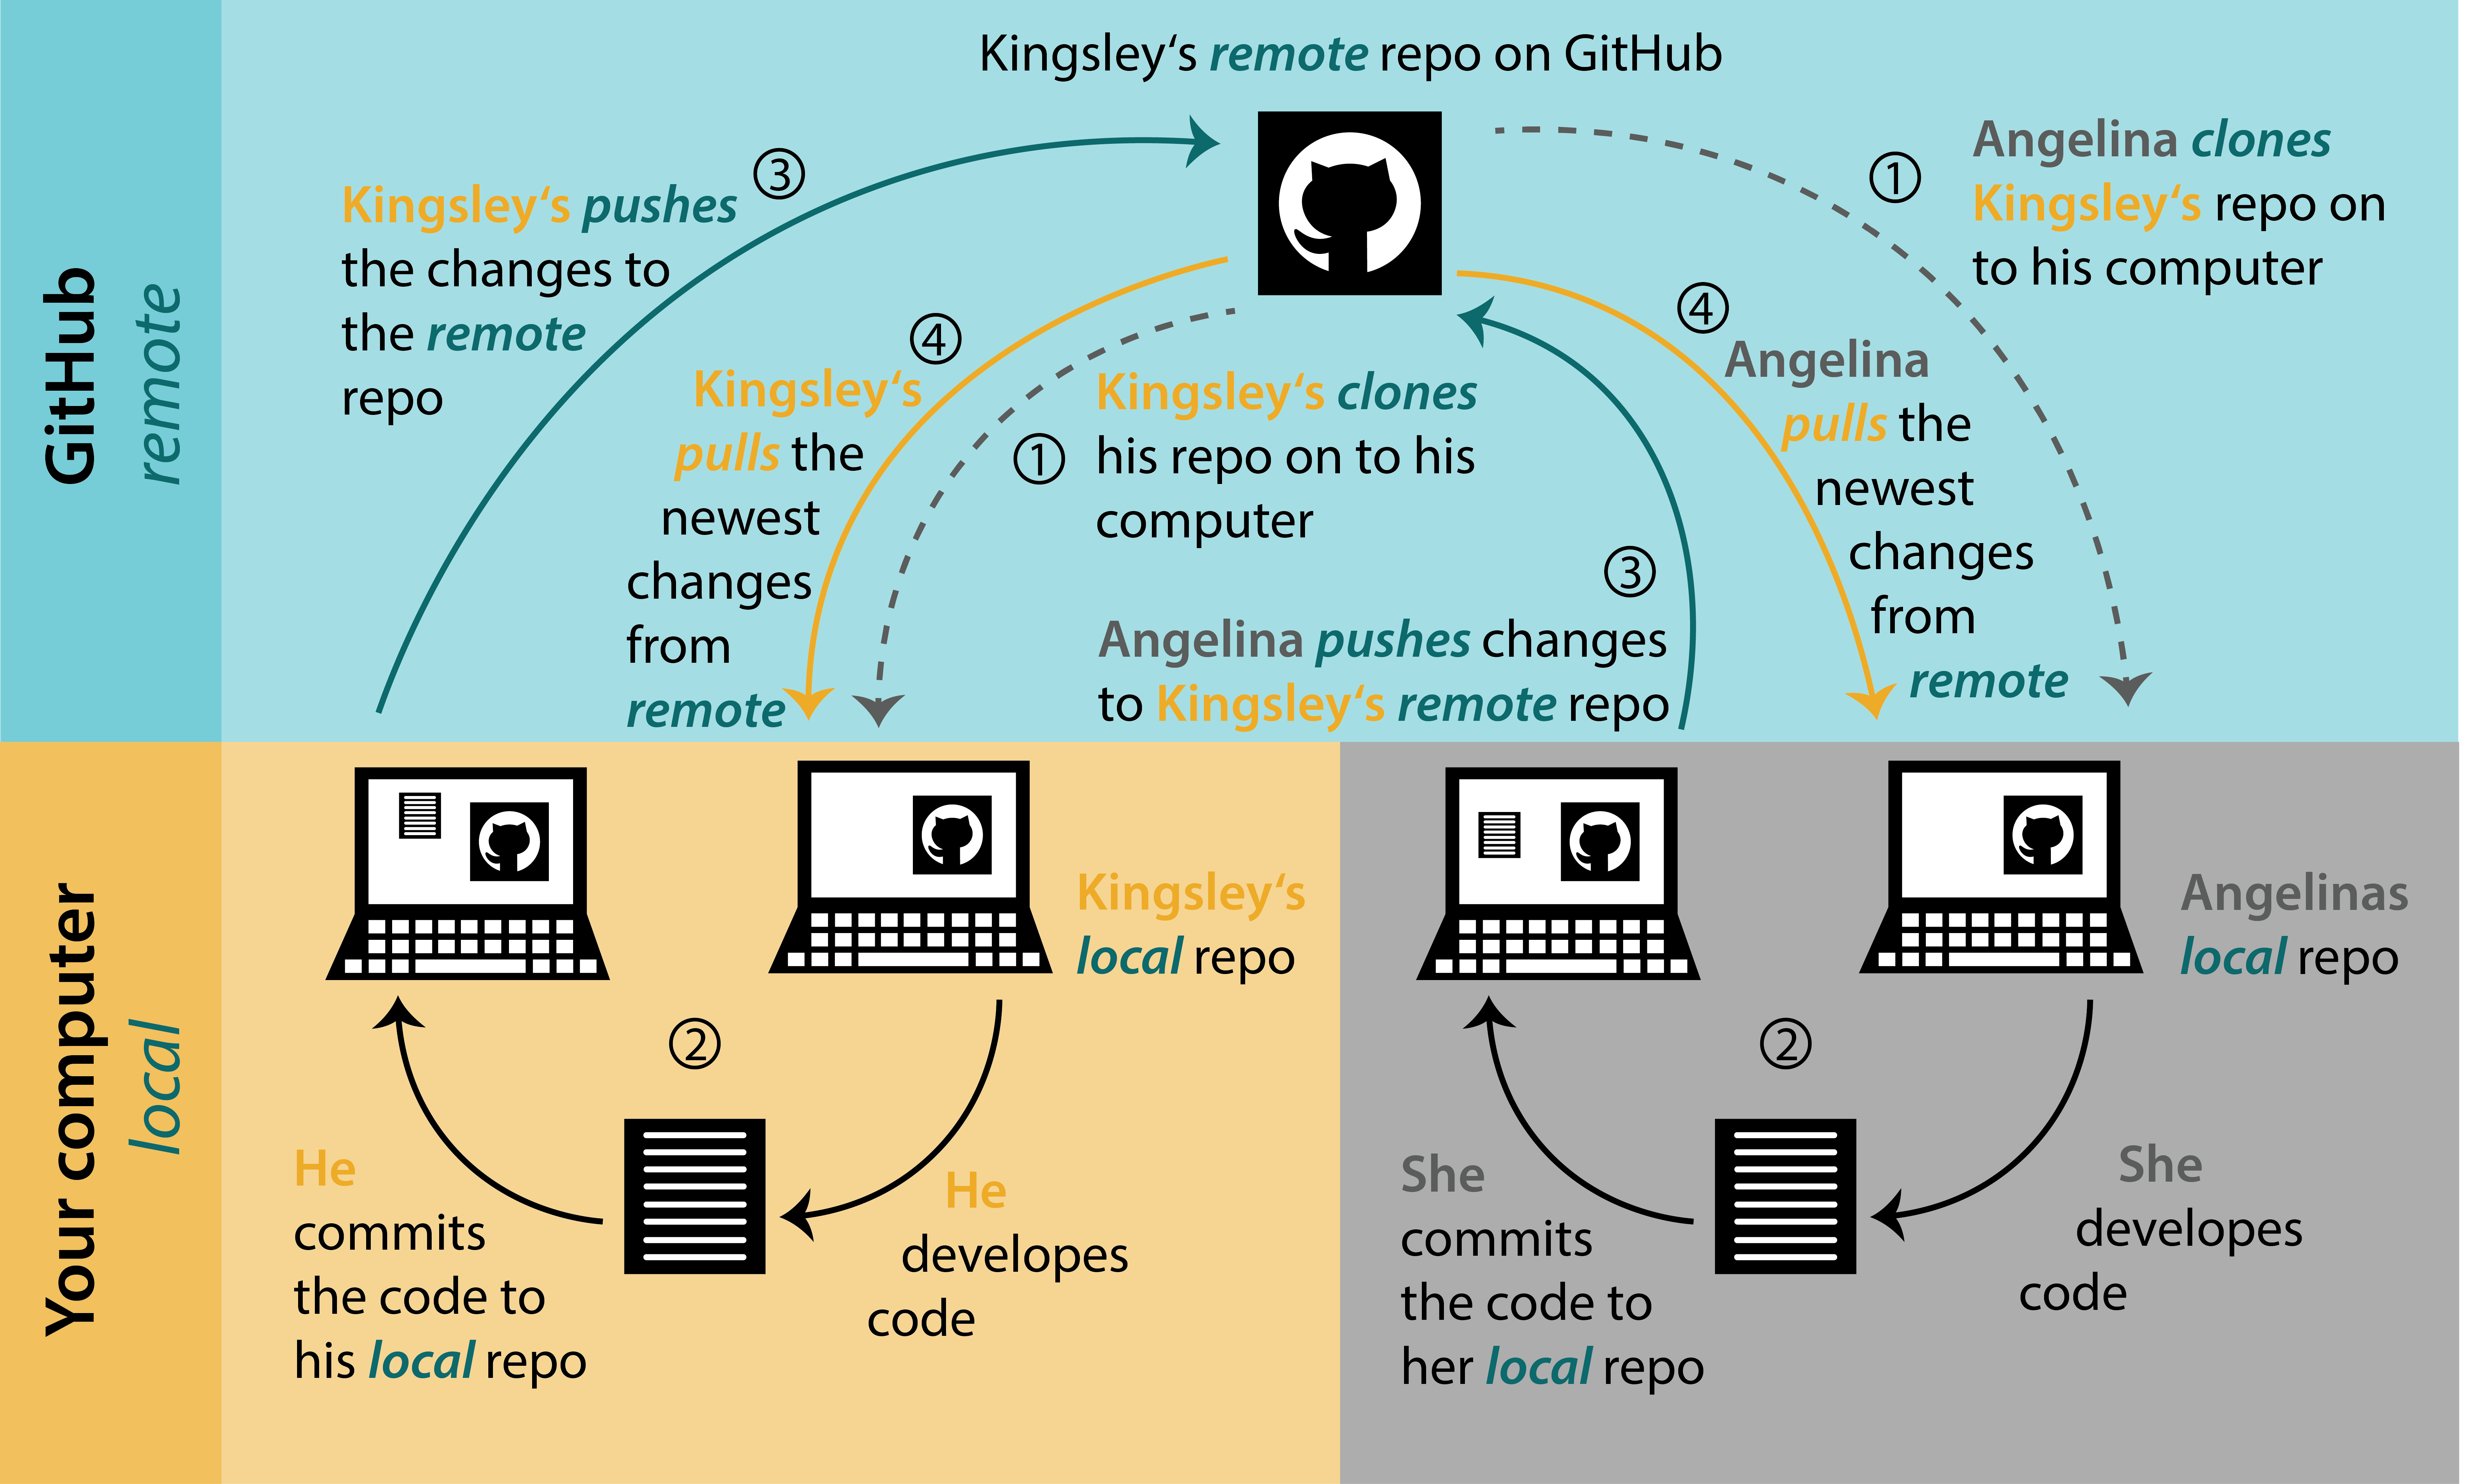
12.5 Local changes, commit, push
Modify the README file, e.g. by adding a line ‘This is a line from RStudio’ and create a new R script with a few lines. Save your changes.
Now, commit your changes to your local repo. Open the ‘Git’ tab.
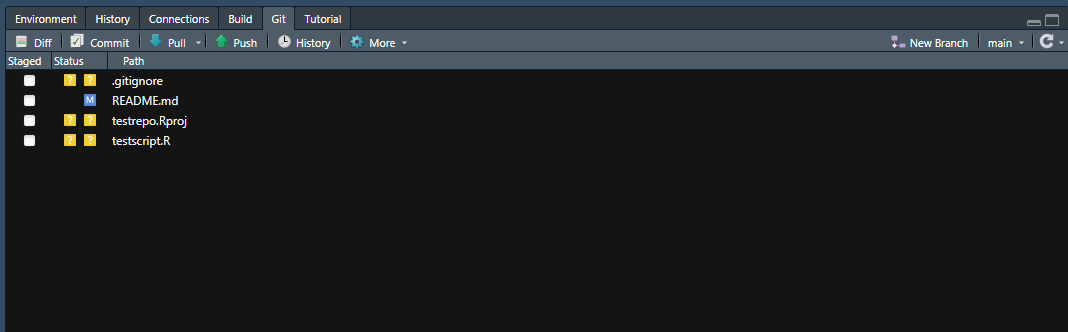
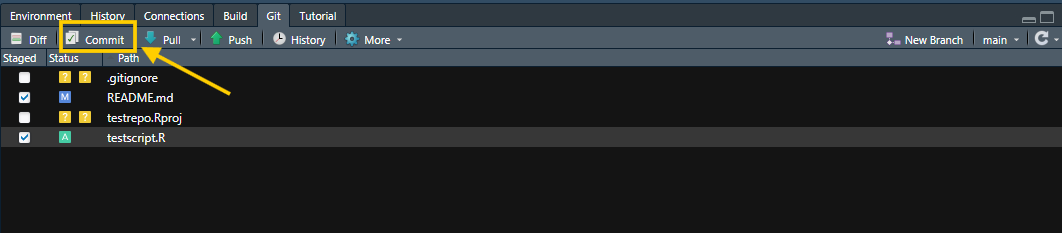
Tick the ‘Staged’ boxes for the files you changed and click on ‘Commit’
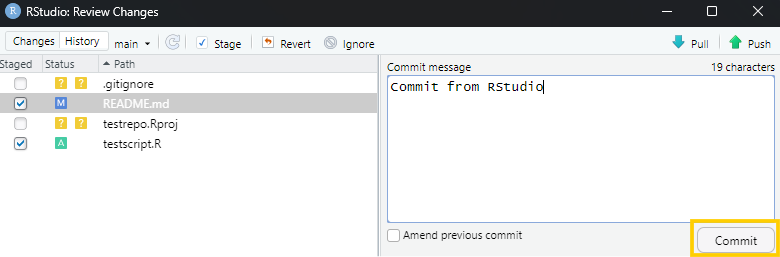
You will see a popup window showing the changes you made. Enter a Commit message and click ‘Commit’.
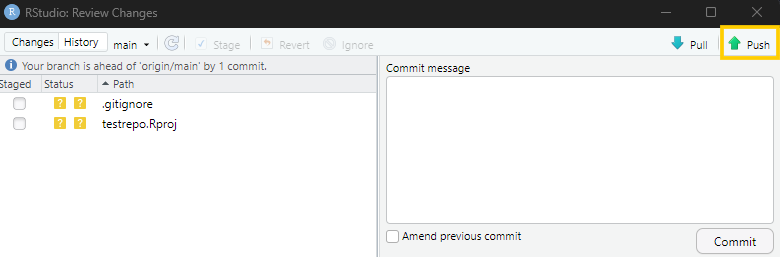
Now you have committed the changes locally. In the top left of the popup window, you will see a message, that ‘your branch is ahead of ’origin/main’ by one commit. It means you have locally committed some changes that are not synchronised with the remote counterpart yet. To send your changes to the GitHub remote repository (push), click on the green ‘Push’ button.
If successful, your changes should now be visible in the GitHub repository. Refresh the webpage with the GitHub repo and check it.
It is a good practice to provide informative commit messages. In case you need to return to a specific version later, it will be easier to find it.
12.6 Remote changes, pull
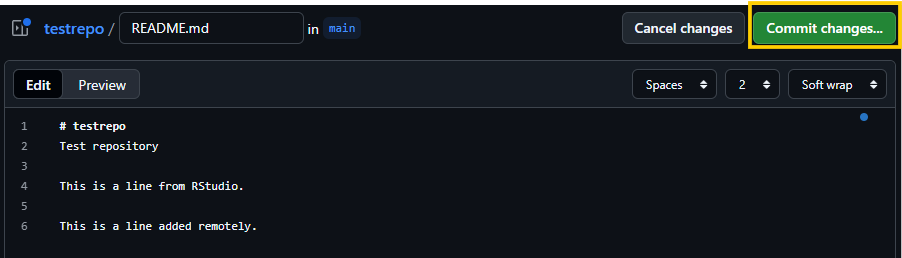
Let’s stay in the remote GitHub repository for a while and try another way to modify files in the repository. At the GitHub webpage, click on the pencil at the top of the readme file to edit it.
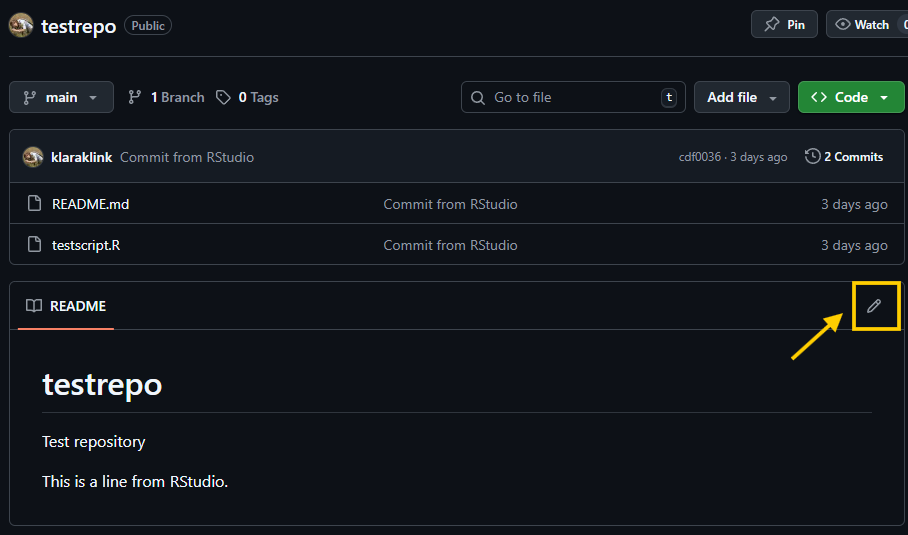
Add a line, e.g., ‘This is a line added remotely.’ and click on the green button ‘Commit changes…’.
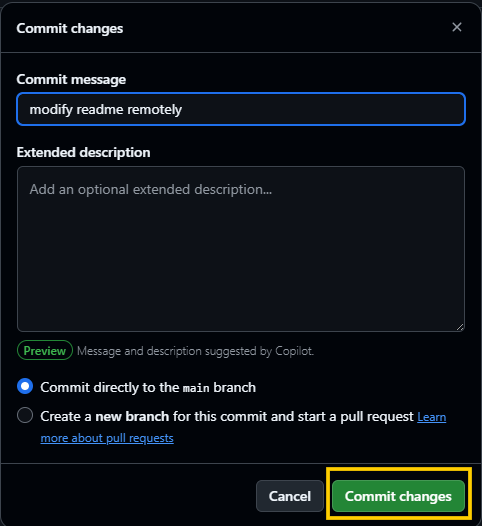
Add a commit message and click on ‘Commit changes’.
Now return to your RStudio, which is now one commit behind its remote counterpart. To synchronise the local repository with the remote, click on the blue ‘Pull’ arrow to pull the changes to your local repository. You can do that either directly in the Git window:

Or first open the Commit popup and then click on the blue arrow.

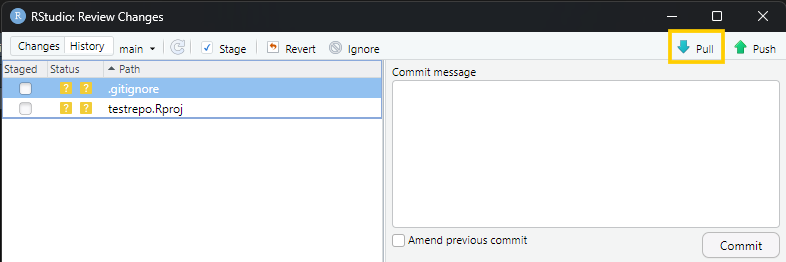
Both ways lead to the same result: you will see a popup window showing what changed and get all the changes made remotely to your local repository.

If you see something like this, you can just close the window. The problem is, if you get some error message that the pull was not successful, but hopefully you don’t.
It is not so useful to modify files in the remote repository. Except for the readme file, we do not recommend adding or modifying files directly on the GitHub webpage. The reason is, you can do whatever you want in your local repository and then commit and push the changes, but not much is possible to modify on the webpage, and you cannot directly test if the scripts work.
The ‘Pull’ button becomes much more useful when you start collaborating with others on the same repository. Each of you has a local copy of the repository, and all of you commit and push changes to the same remote repository. Once you commit your changes and push them to the remote repo, your colleague has to pull them to synchronise his/her local repository with yours via the remote.
12.7 .gitignore
In your local repository, you can also have some files that you don’t want to be tracked. You can add to your repository file called .gitignore to tell Git which files should be ignored, i.e, not be tracked. For example:
# History files
.Rhistory

# RStudio files
testrepo.Rproj

# data - ignores everything in the data folder
data/*

# figures - ignores all figures
*.png
*.jpg
12.8 Collaboration with others
12.8.1 Add collaborators
A huge advantage of GitHub or other hosting services is that you can collaborate with others on the same project. You can add collaborators to your repository by clicking on ‘Settings’ > ‘Collaborators’ > ‘Add people’.
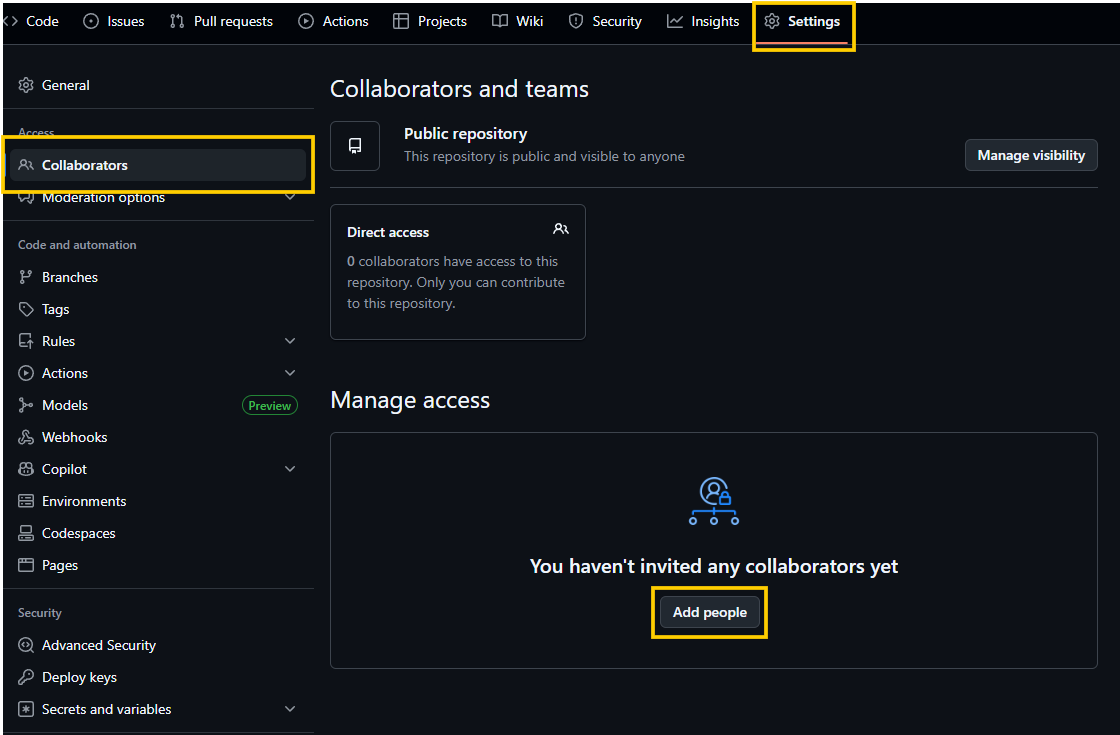
Type the username of your colleague and click ‘Add to repository’. Your colleague will receive an email invitation and has to accept it. Now he/she can clone the repository to his/her computer and get another local repository.
12.8.2 Basic workflow
Both of you can now make some changes, commit them and push to the remote repository. To keep updated and not overwrite changes of the other, you will need to pull changes from the remote that someone else made before you push your changes. Usually, the sequence would be: pull > make some changes > commit > push.
It is not a very good idea for two or more people to work on the same file at the same time, because you can overwrite the changes of the other person. But the project might work very well if you divide your roles somehow, for example, Alice is responsible for the data preparation, Bob for the subsequent analysis, and Cecilia for the final visualisation. Ideally, each of them has its own script and doesn’t overwrite the code of the other, although he/she uses previous steps made by someone else.
12.8.3 Branches
Branching means that you take a detour from the main stream of development and do some work in parallel, without changing the main stream. It might be useful to experiment with some idea, when you are not sure it will work. Or when working with others, you can do your own work on a branch without overwriting someone else’s work and then merge it back later on.
At GitHub, if you look at the ‘Code’ and click on the button with the branch symbol on the left, you can see what branches the repository includes. You will probably see only one branch called ‘main’, which is the default.
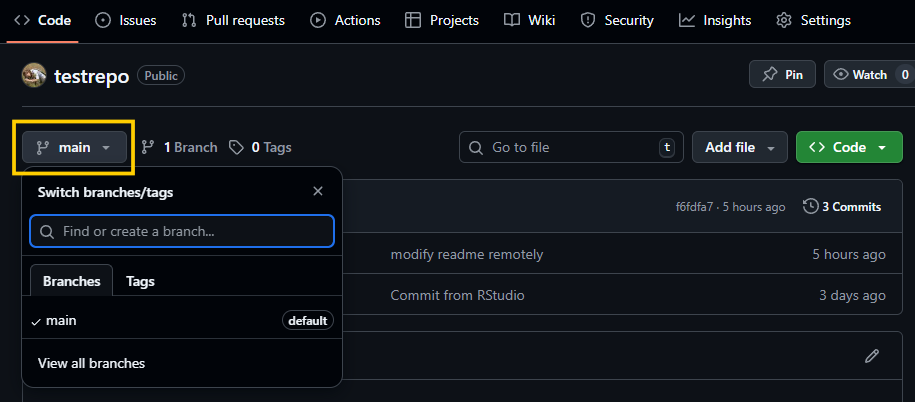
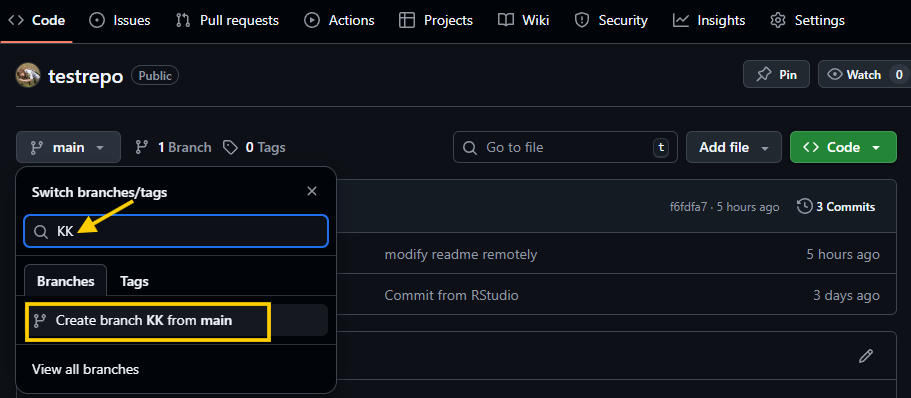
You can create a new branch here. Type the branch name into the search box. You can add, for example, your initials to create your branch in a repo with multiple collaborators. The click on the Create branch button.
In the remote repository, you are now switched to the branch you just created. Come back to the local in your RStudio. To switch to your branch there, pull the remote changes first. Then click on the branch name in the upper right corner of the Git pane and then select your branch.
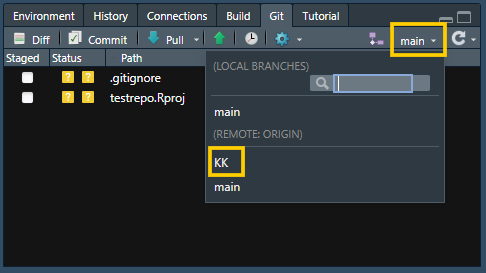
You should see something like this:
>>> C:/Program Files/Git/bin/git.exe checkout -b KK origin/KK
branch 'KK' set up to track 'origin/KK'.
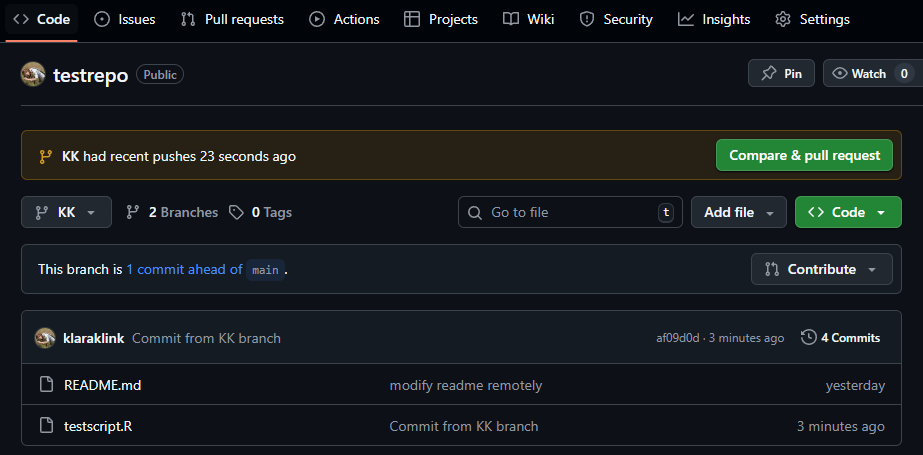
Switched to a new branch 'KK'Now you can make some changes (for example add a new script), commit them and push to the remote. Check the GitHub webpage, if the changes are visible there. You should see something like this:
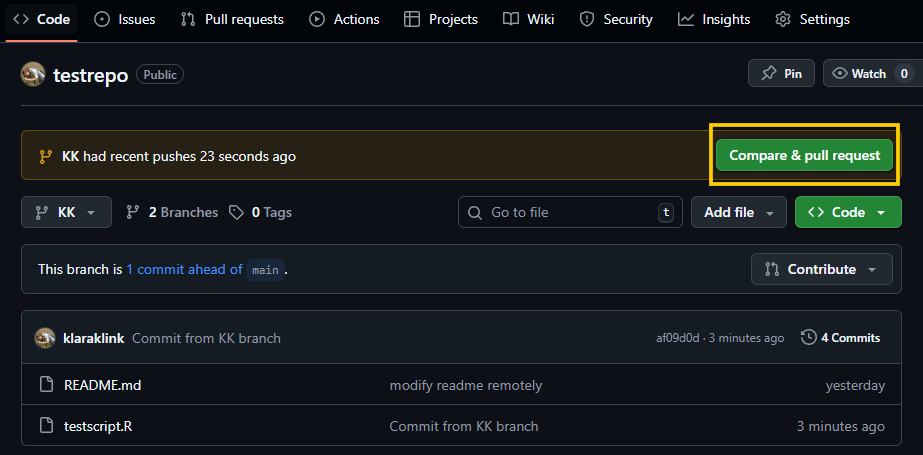
12.8.4 Pull request
To merge the changes back to the main branch, you can make a pull request. Click on the green button ‘Compare & pull request’.
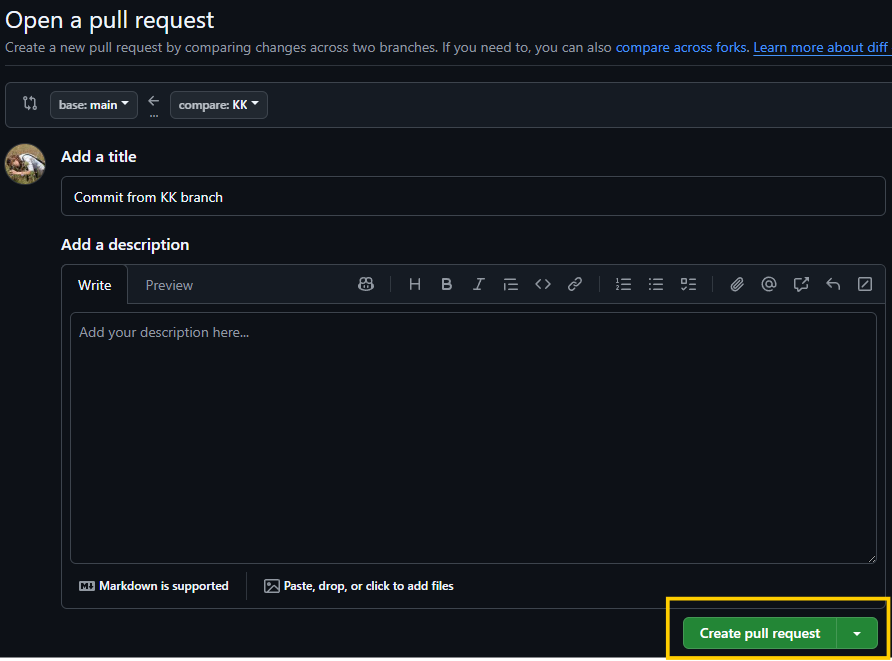
You can now change the title and add a brief description. You can also check the changes when you scroll down. Then click on the green button ’Create a pull request.
The changes you made are still not in the main branch, you just created a request to merge them into the main branch. The second step is to merge the pull request. You can either do it directly by clicking on the green button ‘Merge pull request’.
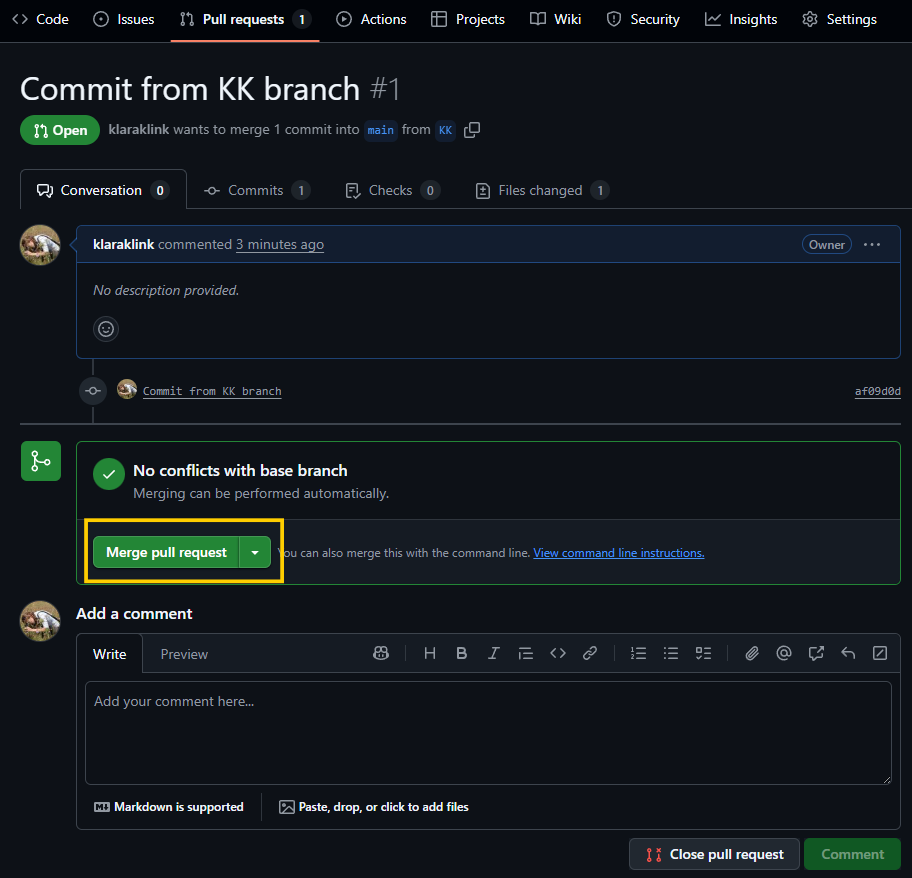
And then ‘Confirm merge’.

Or if you are collaborating with others on this project and you have someone as a project manager, you can (and probably should) leave the pull request open, so that the project manager can check which changes you made and decide to include them into the main branch or not.
For now, you can merge the pull request and check if you see the changes made on your branch in the main branch.
12.8.5 Merge conflicts
Most of the time, the merge will go smoothly. However, if both branches that are merging changed the same part of the same file in the meantime, you will get a merge conflict. The same happens, when you pull/push changes between local and remote in case both of them changed the same part of the same file.
Do not panic when this happens. It’s usually not so difficult to resolve the merge conflict. The first step is to determine, which files are in conflict. Then open the file to see, which lines are in conflict. You will see something like this:
<<<<<<< KK

This is a line from RStudio. Modified in different way.

=======

This is a line from RStudio. Modified.

>>>>>>> main
Where the lines between <<<<<<< KK and ======= are the content from the branch you are currently on. The lines between ======= and >>>>>>> main are from the branch we are merging. To resolve the conflict, we have to edit this section, either keep one of the two version or come with a new one. We also have to remove the conflict markers. Now we can commit the changes to finalize the merge.
How to avoid merge conflicts:
commit often, work in small steps
push and pull regularly
organise your code in multiple scripts, one for each task (e.g., data preparation, analysis, final visualisation)
organise the workflow in multiple steps and divide the work on different part of the code between the collaborators, do not work on the same thing simultaneously
12.9 Time travel
One of the advantages of the version control system is, that you can look back in the history of your repository and see, what changes happened at which stage of the project etc. To see the previous commits in the R Studio, click on ‘History’ in the Git pane. You will see something like this:
 You can check the changes made in each commit by clicking on it.
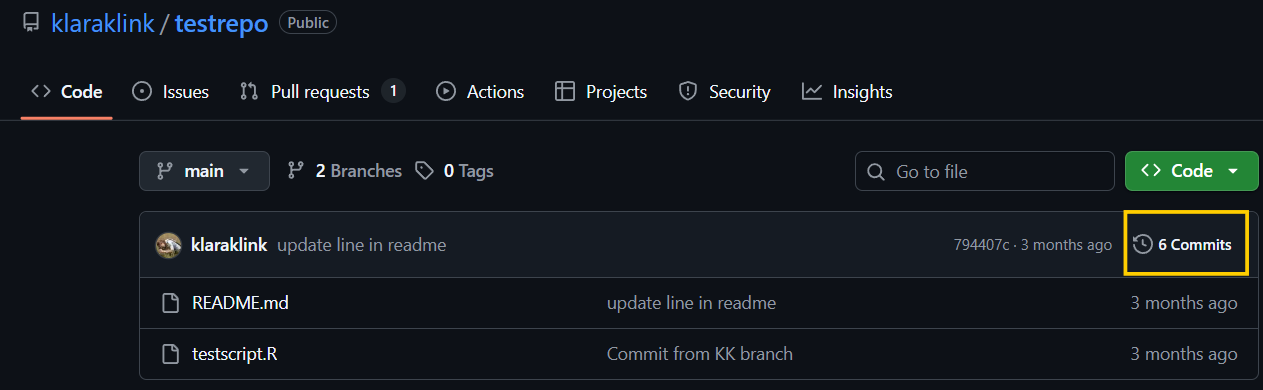
Similarly, you can check the history of the remote repository on the GitHub webpage by clicking on ‘Commits’.
When something goes wrong, you can always return to a previous version of your code. However, be careful when doing that, especially if you are collaborating with others. Look here for some tips on how to get out of terrible situations.
12.10 Glossary
- repository (repo)
- the directory or folder for version control
- local
- the repository on your computer
- remote
- the repository on GitHub
- clone
- get some work from a remote for the first time
- stage
- choose the changes you want to record before you commit them
- commit
- a record of change. If you create or edit a file in your repository and save the changes, you need to record your changes via a commit.
- hash
- commit id
- push
- send commits from the local repo to the remote
- pull
- retrieve commits from the remote repo to the local
- diff
- differences between two commits
- branch
- a stream of work development
- pull request
- request to merge one branch to another
- merge
- combine two branches
- merge conflict
- when the same part of the same file changed in two different sources (two branches, or local and remote) and are not able to merge automatically
- checkout
- time travel to a specific commit in the past
12.11 Other Tips
- You can use private repositories for work in progress which includes data and scripts that are not published yet and you don’t want to make them public, e.g., before publishing a scientific paper based on the analysis.
- If you are a student or a university researcher, you can get access to GitHub Education, which provides some benefits, such as free private repositories with more than three collaborators, access to GitHub Copilot, etc.
- You can use the connection between GitHub and Zenodo to publish data and scripts associated with your scientific paper and get DOI for them. Look here for the instructions.
- It is also possible to create and host a webpage like this one through GitHub. Some researchers create their personal webpage this way. To do that you will have to learn basics of Quarto, but don’t be afraid, it is not so difficult. We recommend looking here for some introduction to Quarto and here to explore more about GitHub pages.
12.12 Exercises *
- Create a new GitHub repository, connect it with your RStudio and create a version control project on your computer. Create a usual project structure from your local repository (add folders for data, scripts, plots, etc.). Add a readme and some scripts or data from this course. Commit the changes and push them to the remote repository. Check if everything works.
- Add collaborators (e.g., those who sit next to you) to your repository.
- Make this repository private.
- Create a branch for each of you.
- Switch to your branch, make some changes, commit them and push to the remote.
- Create a pull request to merge your changes with the main branch.
- Delete the repository.
12.13 Further reading
Happy Git and GitHub for the useR: https://happygitwithr.com
BioStats Version Control with Git and GitHub: https://biostats-r.github.io/biostats/github
Flight rules for Git (what to do when things go wrong): https://github.com/k88hudson/git-flight-rules
How to get out of terrible situations: https://ohshitgit.com
Open source game to learn Git: https://ohmygit.org
GitHub Training Kit: https://training.github.com
GitHub learning sources: https://docs.github.com/en/get-started/start-your-journey/git-and-github-learning-resources
Ten simple rules for taking advantage of Git and GitHub: https://doi.org/10.1371/journal.pcbi.1007142
RStudio Version Control Guide: https://docs.posit.co/ide/user/ide/guide/tools/version-control.html
Pro Git: https://git-scm.com/book/en/v2